Supported Games


- Current Versions
- How does it work?
- How do I create a pipe?
- How can I speed it up?
- How can I change the pipe's settings?
- How can I filter items?
- How do I use auto-start?
- Can I send things to multiple containers?
- What commands are there?
- Priority
- Combining the filter with the priority
- Configuration file
- Assigning permissions to players
- Sample Config File
RIP SyncPipes...
As you may, or may not have seen, february's update will be bringing pipes to vanilla Rust. This makes this plugin redundant.With that I will no longer be updating this plugin.Thank you to everyone who has downloaded, given feedback and helped me with developing this plugin.
Joe 90
![]()
Before I go into detail on what this plugin can do I'd like to say a big thank you to TheGreatJ who made the amazing jPipes plugin, which this is based on.
It has been re-written to make the pipes work synchronously with all pipes connected to the same container. This allows for advanced sorting and filtering of items into your containers, shops, furnaces, etc.
Downloads
Current Versions
- Stable Version 0.9.32 - Download Stable
- Beta Version 0.9.35 - Download Beta
For more information on all releases click here and watch the post for updates.
Please help me out and download the beta version and help me with my testing. I will always try my best to ensure the beta versions are stable however more servers I can get testing the beta the faster I can find and fix any issues.
Past Versions
You can see all versions of SyncPipes on the updates tab. By default this will show you the stable (master) version of the plugin. If you want to help out and test the new version before everyone else you can click on the drop down (master) and select the beta branch to see all beta version.
What can it do?
syncPipes allows you to connect multiple containers together to automatically:
- Move items between container
- Filter items to allow you to sort what goes where
- Splitting stacks evenly between multiple containers
- Send raw materials into a furnaces or refineries for processing
- Supplying fuel Mining Quarries and Pump Jacks and collecting the output
- Auto-filling your shops with the correct items and collecting the payments
Getting Started
How does it work?
You can connect containers together to move items from one container to the other. Once created you can then change the settings of the pipe to do all sorts of things:
- Turn the pipe off to stop the transfer of items
- Set whether the items will fill the destination container or only take up 1 stack
- Add items to the filter to limit what the pipe can transfer
- Automatically start a Furnace, BBQ, Pump Jack, Quarry, Oil refinery or Recycler when the correct items are moved to it.
- Split the items evenly into multiple stacks in an oven using the Furnace Splitter mod.
- Reverse the pipe to send items back the other way
How do I create a pipe?
Creating a pipe is very simple all you need to do is type /p into chat. You then need to use a wooden hammer to hit two containers and this will create the pipe. The first container you hit will start to transfer items to the second container.(It is possible for server admins to configure the server with a different command other than /p so check your server settings for the correct chat command)
How can I speed it up?
The pipe only has a certain capacity to move items along it. The better the material the more items it can move at a time. To take advantage of this you can upgrade your pipes as you would any other wall by using the wooden hammer.
Each upgrade will also give more slots to filter items with, but we'll cover that in more detail later.
How can I change the pipe's settings?
Each pipe has a menu that you can open by hitting it with a wooden hammer.
For a pipe that just goes between normal containers (eg. furnaces, oil refineries etc.) you will get the following menu:
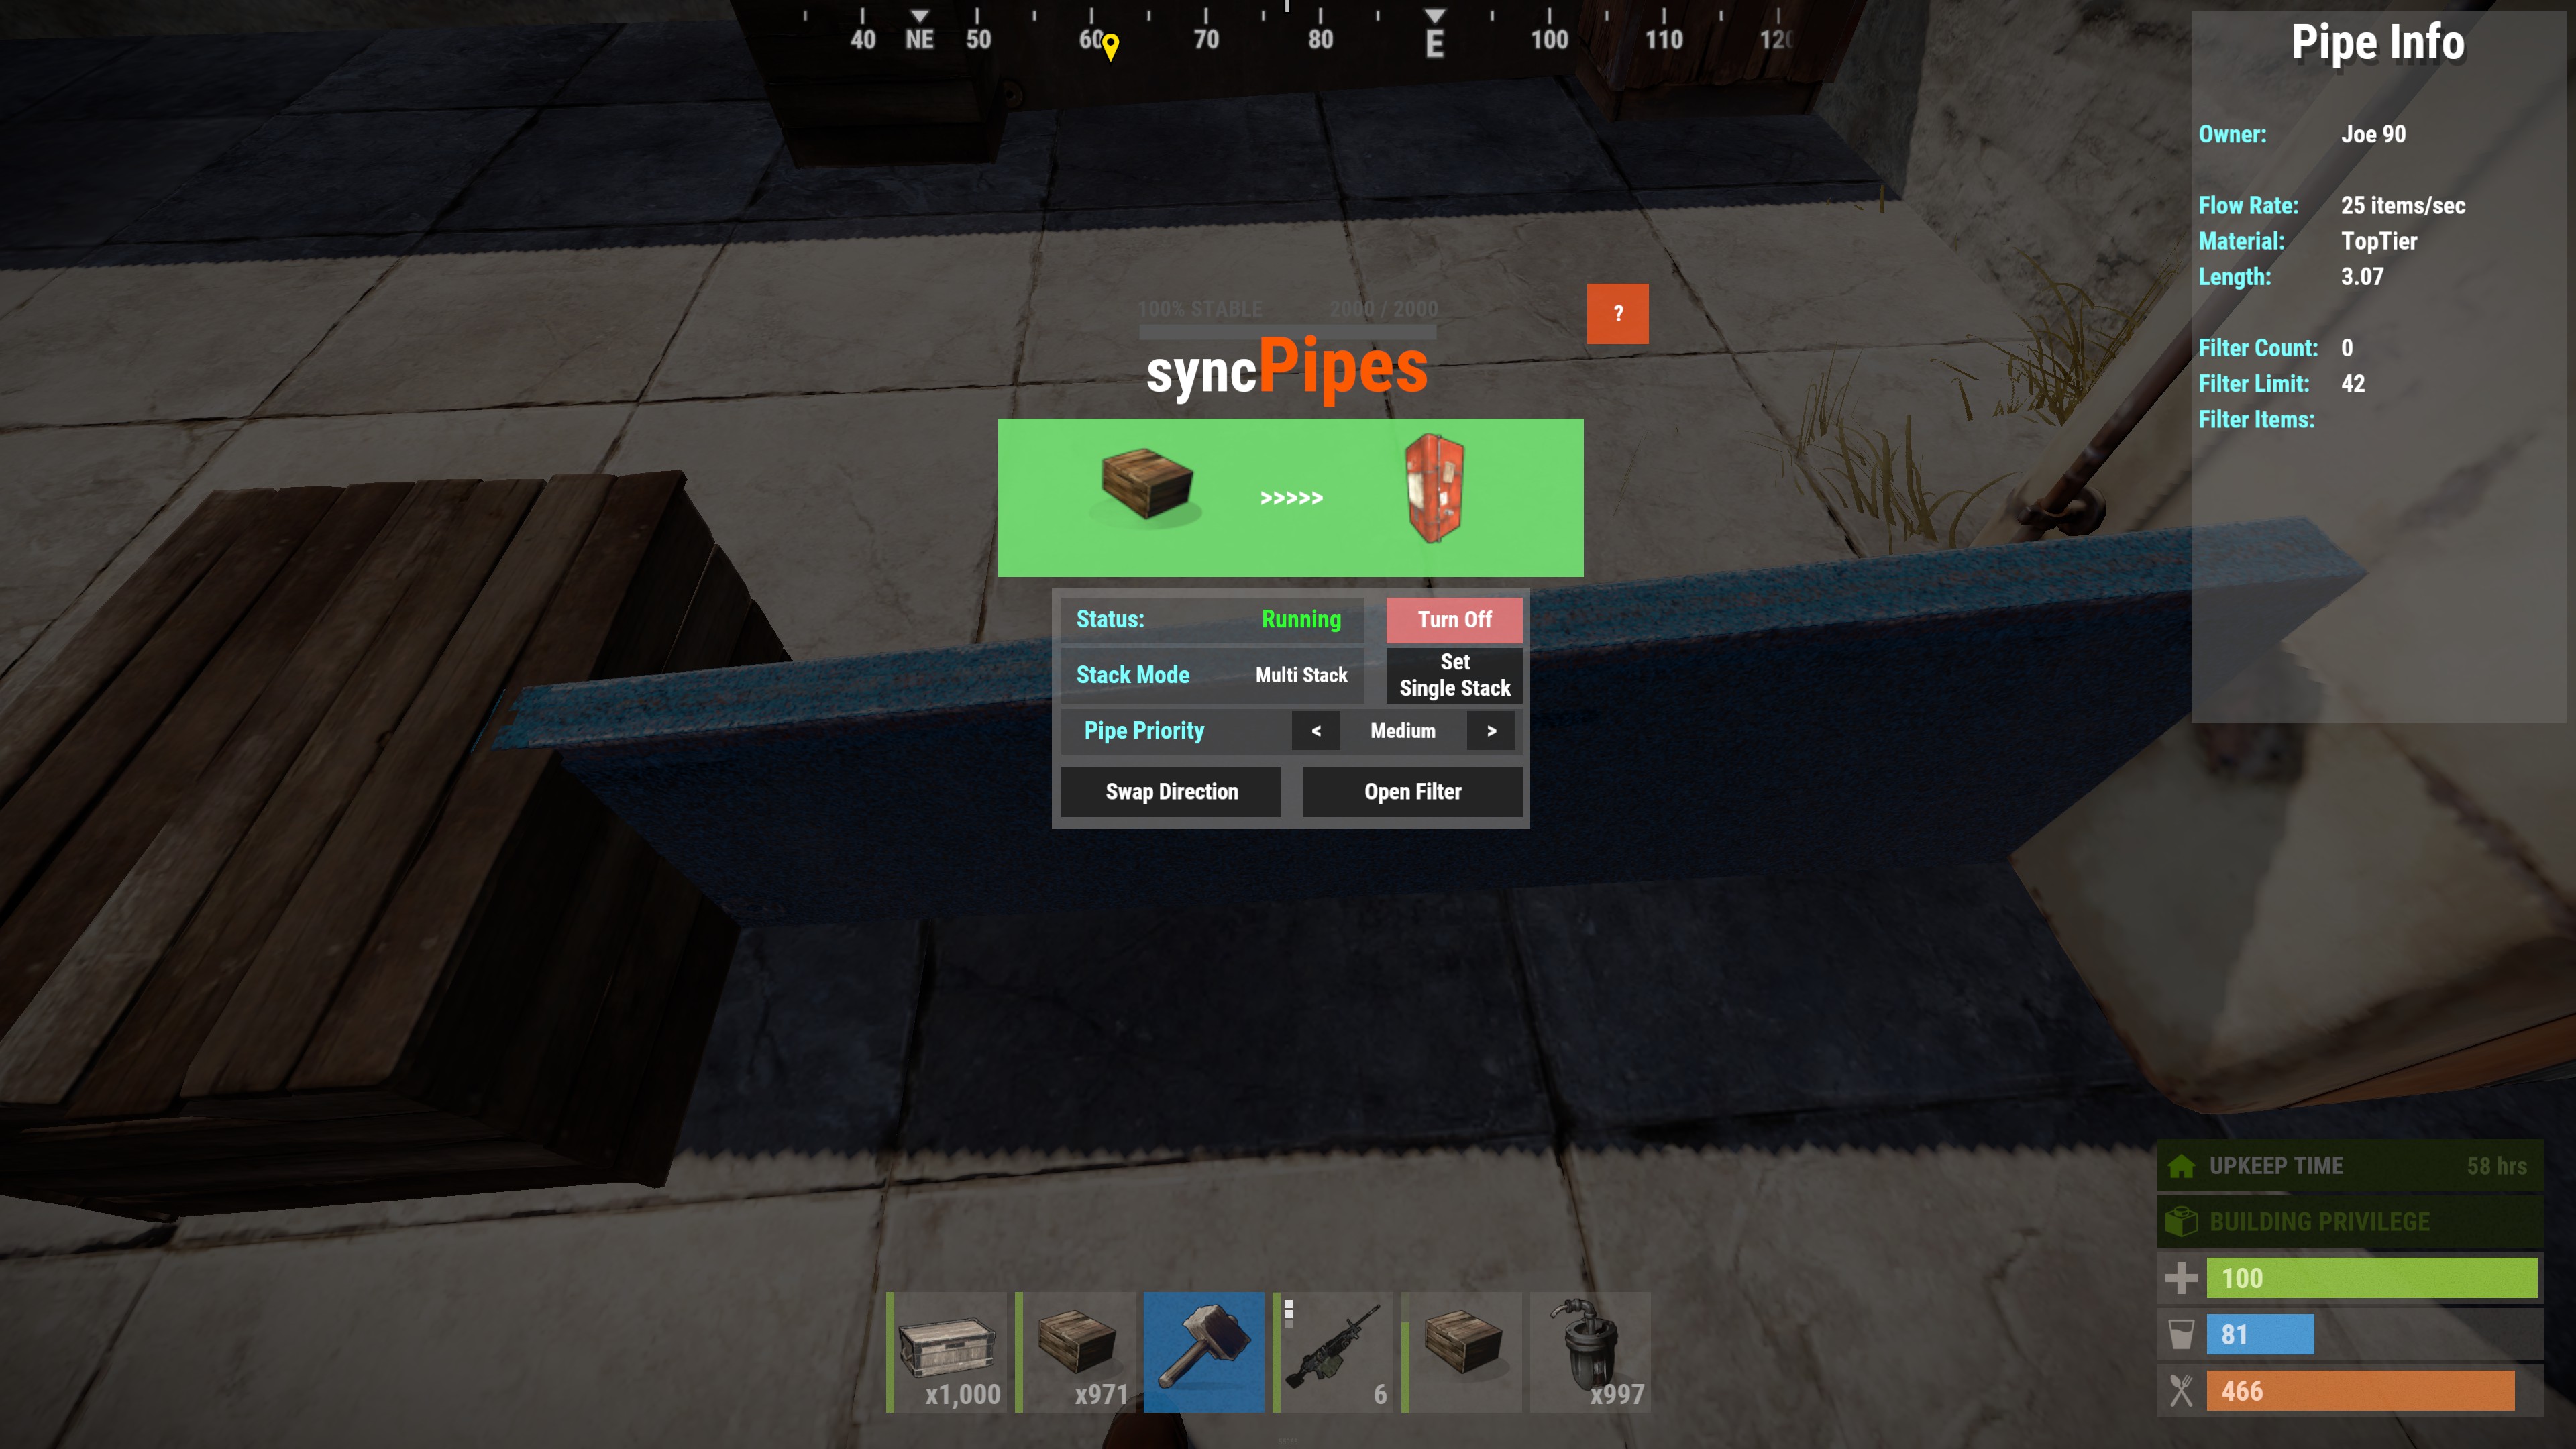
The top bar (in green) shows the source and destination containers with items moving from left to right. The number of '>' between them shows the rate of items moving through the pipe.
- Status: This shows you if your pipe is running or not.
- You can start or stop the pipe by clicking the corresponding button to the right
- Stack Mode: This shows whether the pipe will fill the destination container or just make a single stack of items in it
- You can set the stacking mode of this pipe by clicking the corresponding button to the right
- Pipe Priority: This shows the priority that the items will use this pipe. (We'll cover this in more detail later)
- You can increase the priority by clicking the '>' button
- You can decrease the priority by clicking the '<' button
- Swap Direction: If you click this it will reverse the direction of the pipe and start move items the other way.
- Open Filter: If you click this it will open a filter container that allows you to set what the pipe can transport. (We'll cover this in more detail later)
- In order for the filter to appear you must have upgraded the pipe at least to wood.
At the top right of the screen is an info panel that give you an overview of the pipe and its filters.
If the second container is a recycler, mining quarry or pump jack you would get the following menu with more options
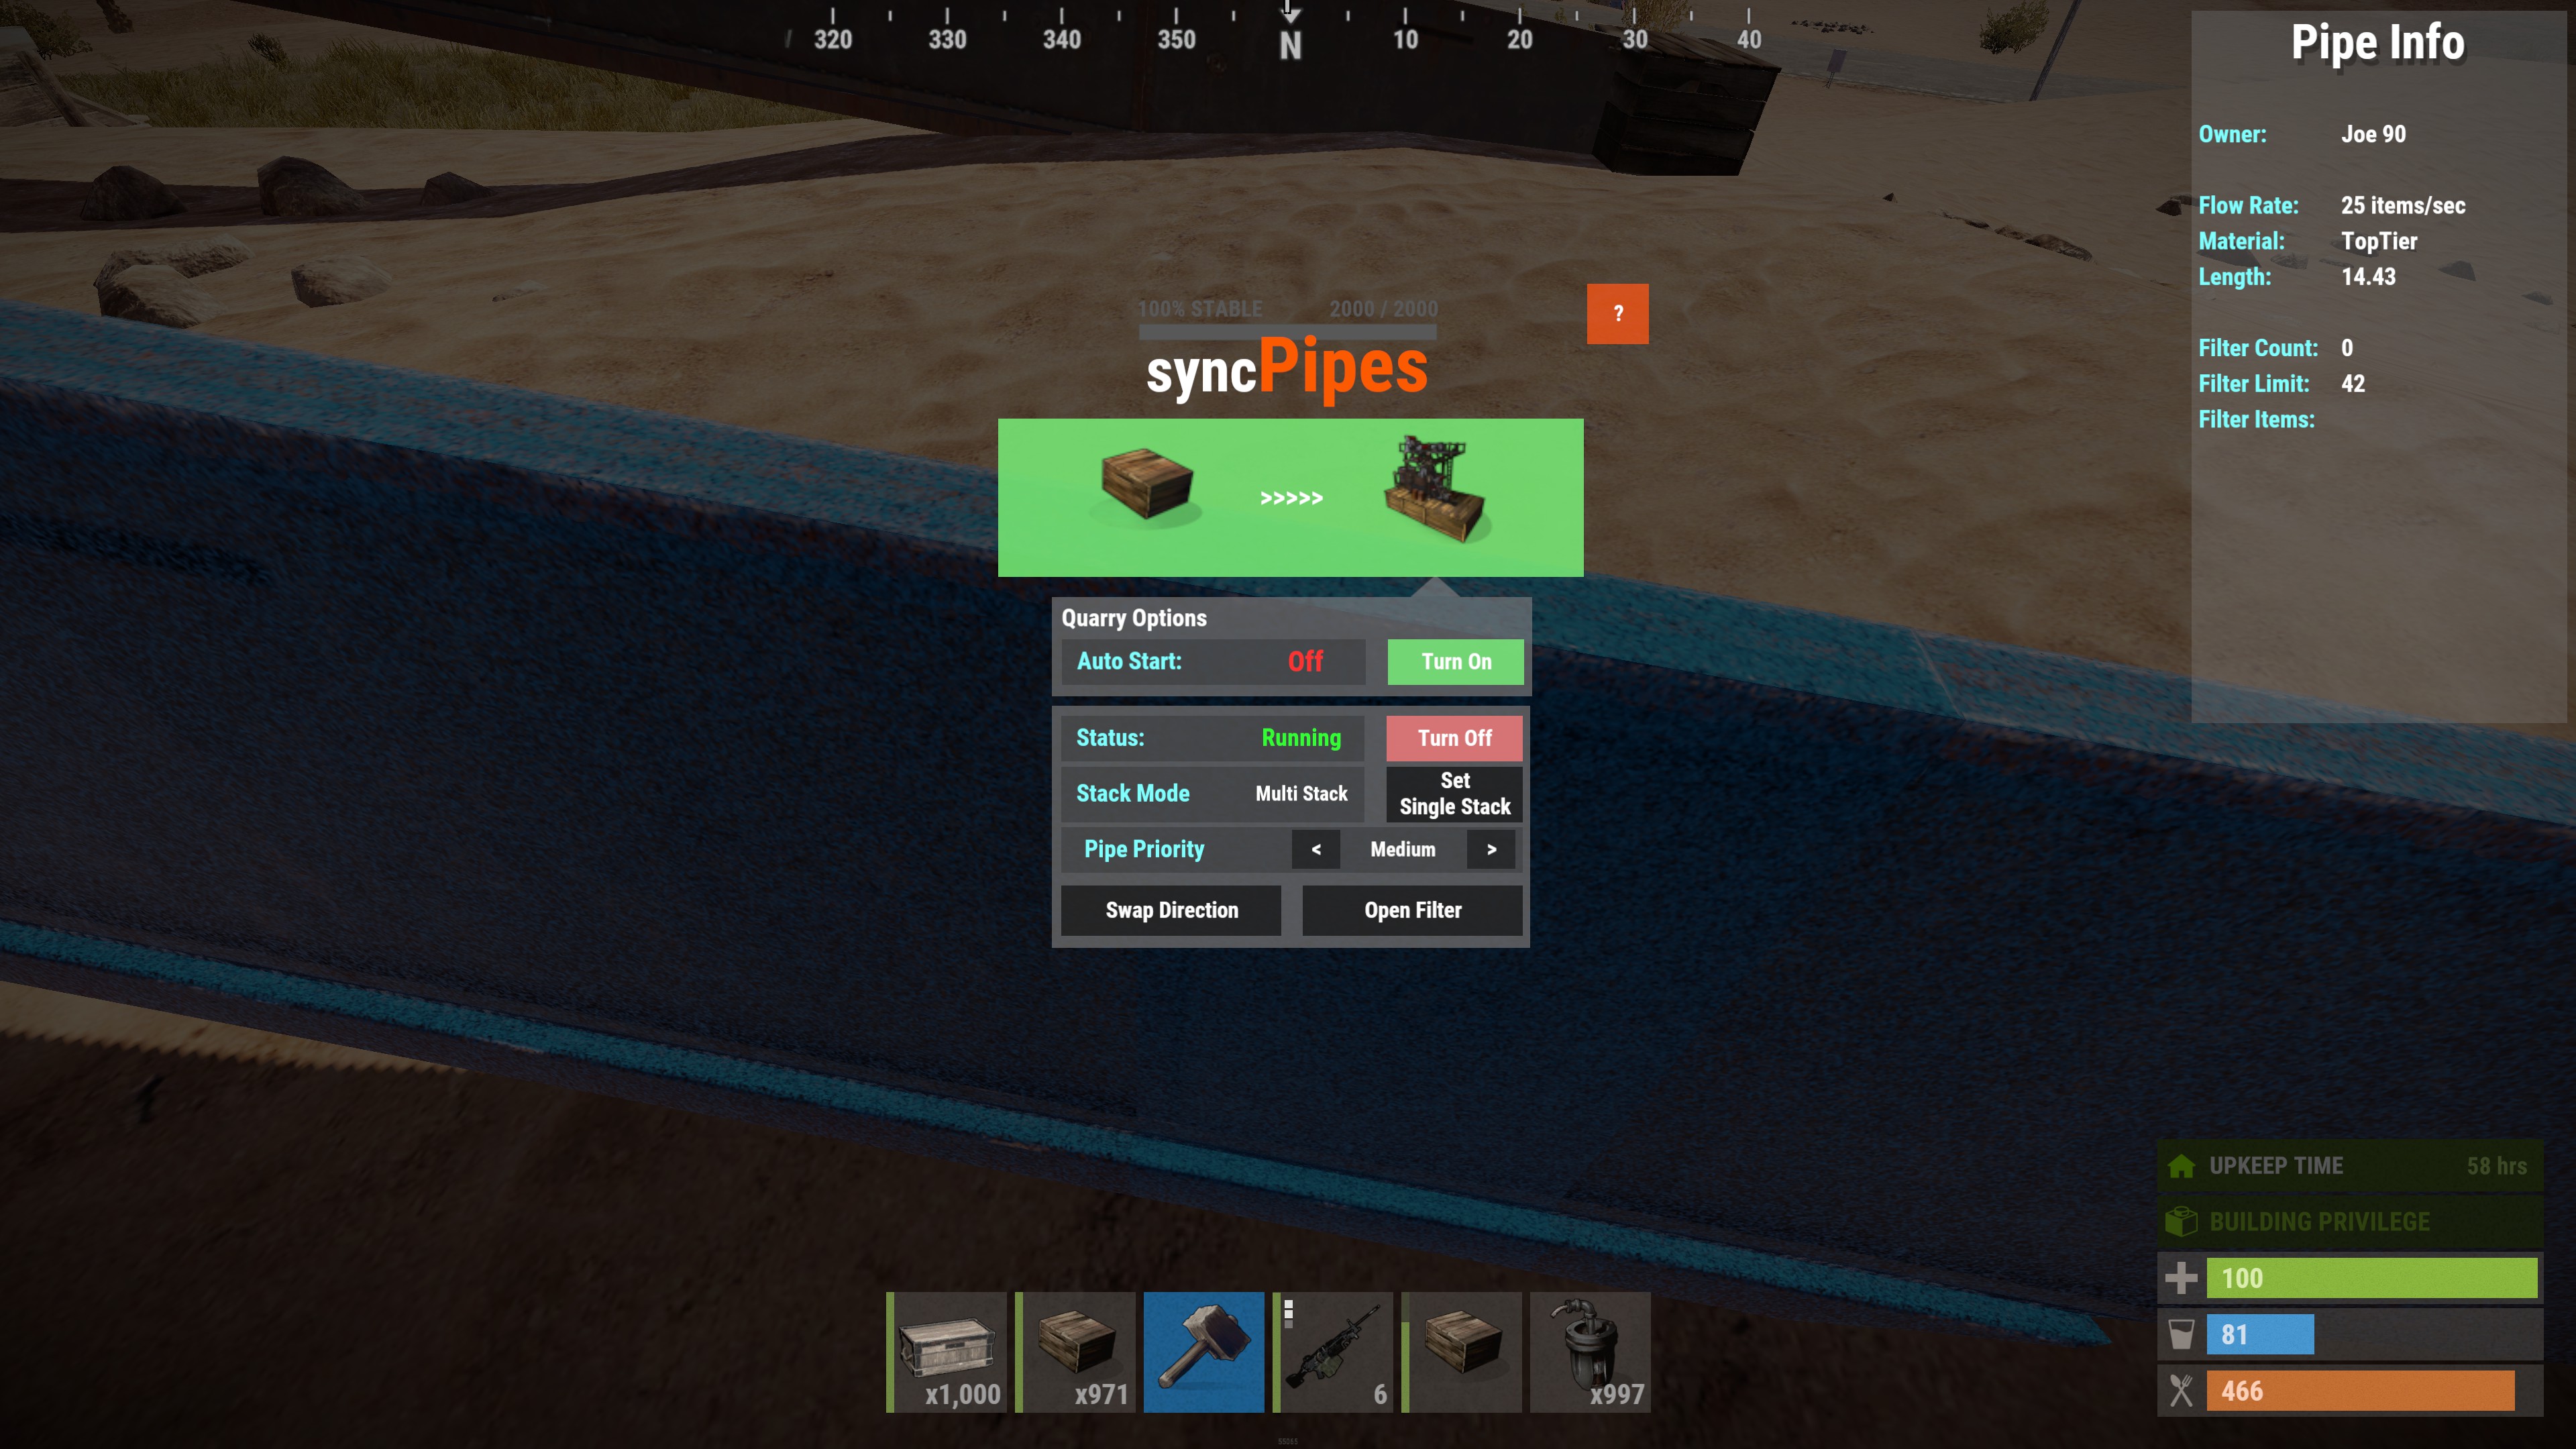
This now gives you additional options. This will only apply if it is the destination of the pipe.
Auto Start: This shows if the pipe will attempt to start the destination when an item is moved to it
- You can turn it on or off by clicking the corresponding button to the right
The final menu you will only see if the second container is a furnace or refinery and the server also has the Furnace Splitter mod installed
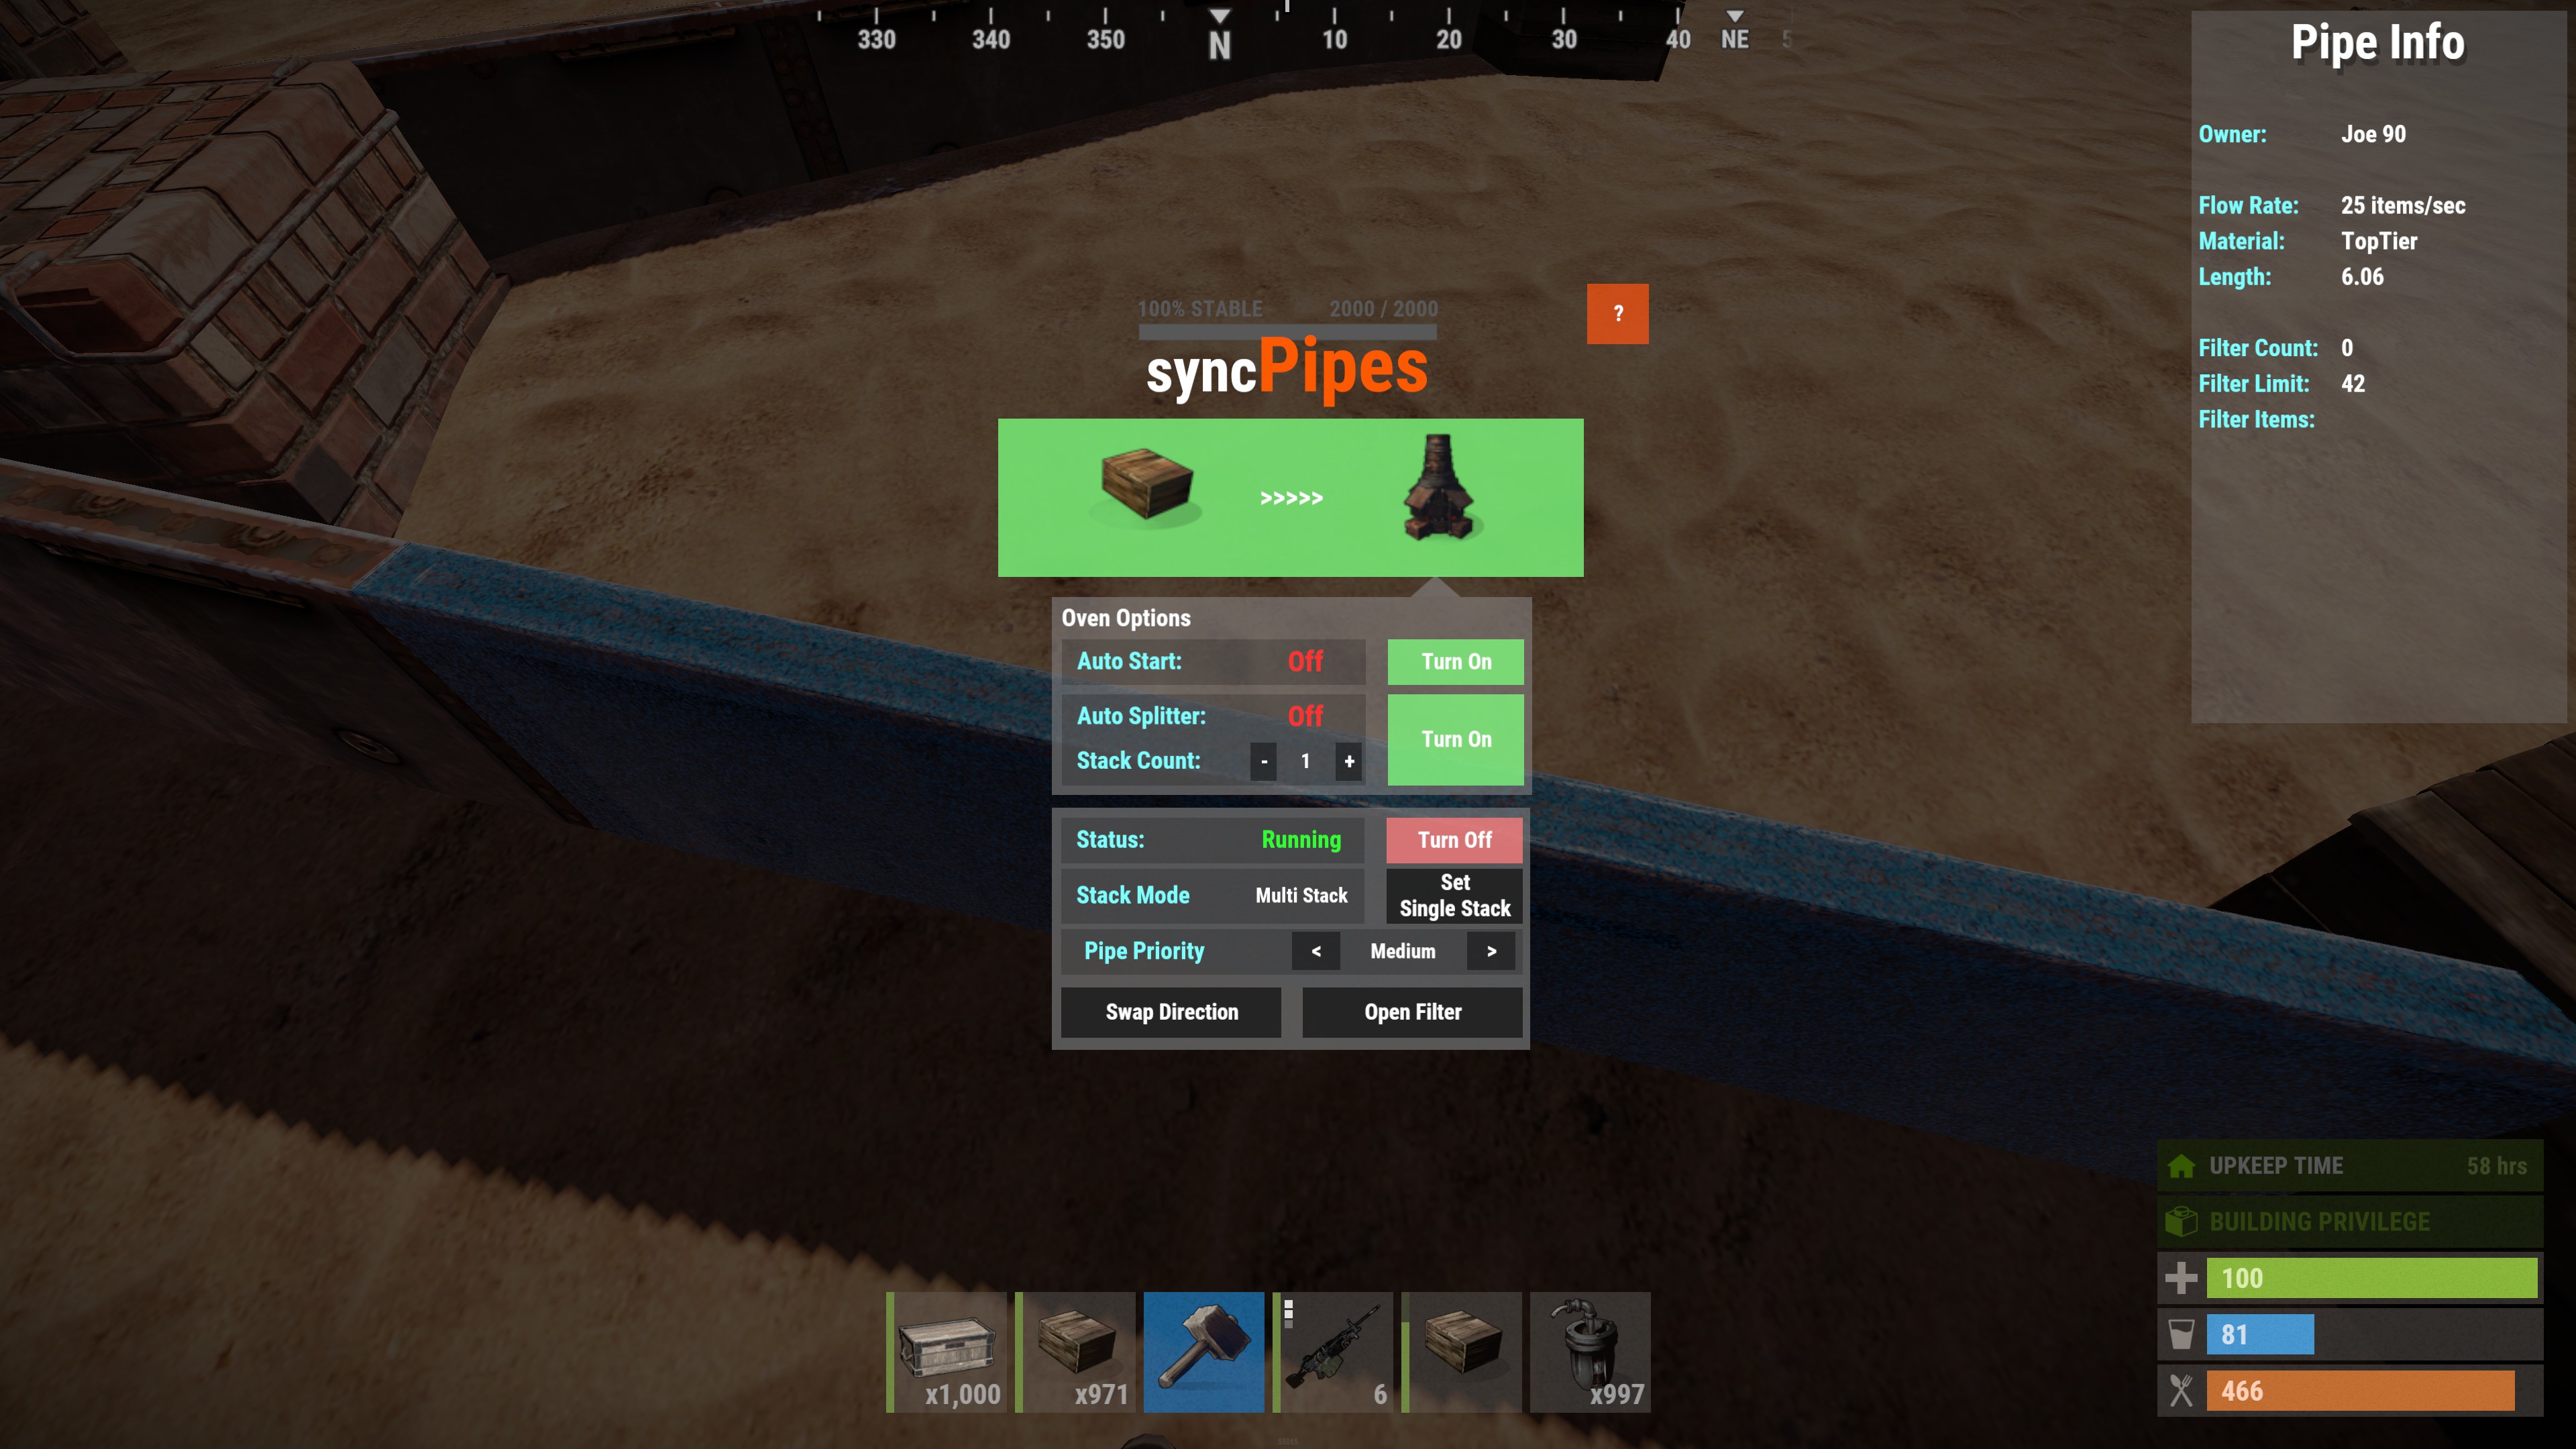
This gives you the final options
- Auto Splitter: This shows if the items should be split into even stacks in the furnace
- You can turn this on and off using the corresponding button to the right.
- Stack Count: This shows how many stacks the items will be split into in the furnace
- You can increase the number of stacks by clicking the ' ' button
- You can decrease the number of stacks by clicking the '-' button
If you need more hints in game click the '?' button and it will give you a description of each item.
How can I filter items?
If you click 'Open Filter' from the pipe menu it will open the filter as a loot container in your inventory. You can then simply drag items into it to set this as something the pipe can allow through. Dragging an item means the pipe will no longer allow it through.
The filter items are not added or removed from your inventory they are simply shown as an indicator of what is being filtered.
If the pipe's filter is completely empty then the pipe will let everything through.
How do I use auto-start?
Can I send things to multiple containers?
All pipes that are attached to a container will operate at the same time to move items from the container. If they are the same priority then the items will be split evenly amongst the pipes.
What commands are there?
The /p command for creating pipes you already know, but there are a few extra commands that might come in handy
/p r Remove pipes by hitting then with a wooden hammer
/p c Copy the settings and filters from one pipe by hitting it with a wooden hammer and then hit other pipes to apply these settings to it.
/p n Set a name to a container or pipe. This is useful if you have pipes running between two identical containers and you want to tell them apart. Or when you have long pipes want to know what they are for.
/p s Get information on how many pipes you have and how many are running
/p h Bringing up the in game help
Advanced Sorting
Priority
Each pipe has a priority. The first item in the container will be selected and grouped with all other stacks of the same item. This is then split evenly and sent along the highest priority pipes first (limited by the pipes flow rate). It will repeat this for the high priority pipes then the medium, the low and the lowest. The pipes will only move one type of item at a time for each priority level.
Combining the filter with the priority
By combining the filter with the priority we can set up some advance sorting to allow items to be processed and sent to their correct destination with multiple routes and splits along the way.
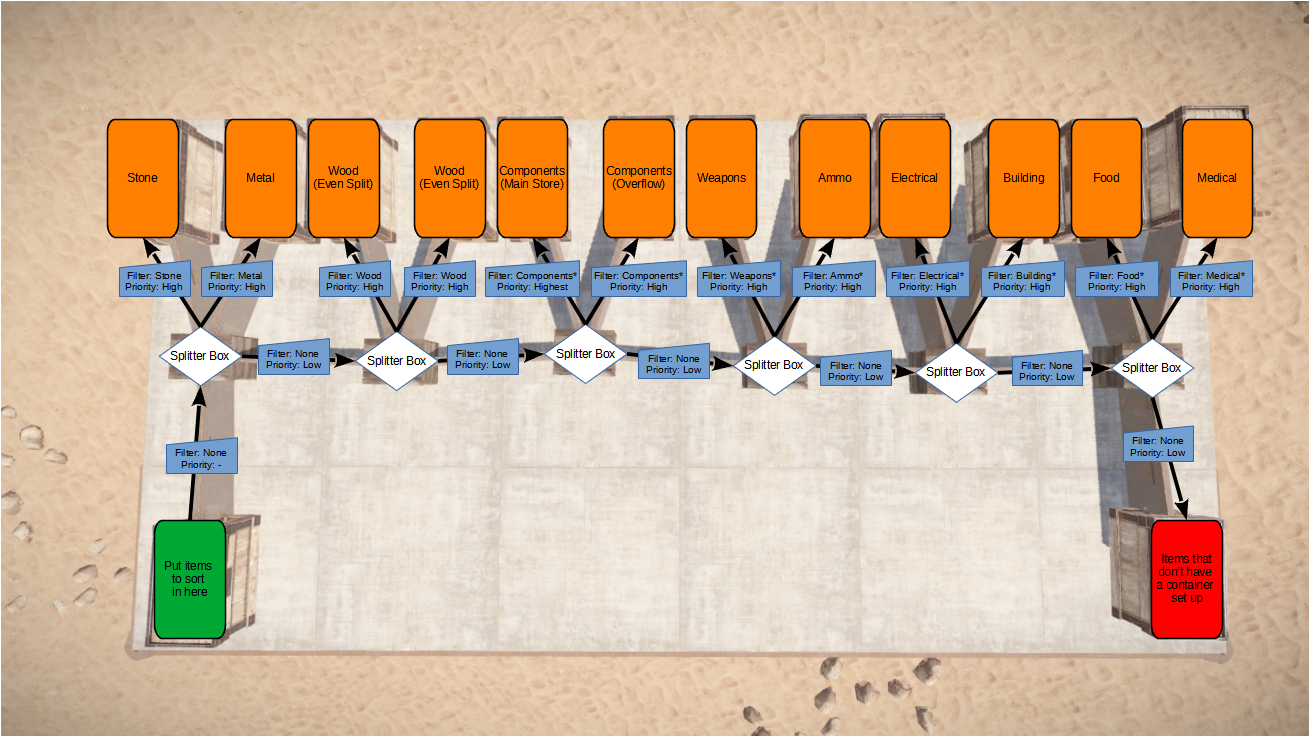
In This example you have a single container, on the left hand side, that you put everything into. The items then travel along the line of splitter boxes. If there is an appropriate container the item will be moved into it. Otherwise it will go into the container on the right hand side. This allows you to see what you might have missed from your sorting or could be connected to another set of filter pipes.
Lets go through this in a little more detail.
You'll notice that from the first splitter box there are two pipes going up into the "Stone" and "Metal" storage containers. there is also a pipe going to the next splitter box. The pipe going to the next splitter box has no filters on it which will allow precious stone and metal to not make it into their respective containers. To prevent this we just need to make sure that the priority of the pipes going to the "Stone" and "Metal" containers is higher than the pipe going to the next splitter box and hey presto all stone and metal will be filtered out.
At the next splitter box you will see we have two "Wood" storage boxes and we want them to fill up at the same rate. Simply set them to the same priority and syncPipes will do the rest. Again make sure that the pipe leading to the next splitter box is set to a lower priority to prevent any wood escaping.
At the next splitter we again have two containers that we want to store the "Components" in. However in this case we want the left container to fill up first. To do this just set the left container to a higher priority than the right and it will fill this one up first. Ensuring that the pipe to the next splitter box is the lowest priority to stop it taking any components.
You can make this as simple or as complicated as you like. It's up to you...
Server Setup
Configuration file
General Settings
The default settings file is as follows:
{
  "filterSizes": [
    0,
    6,
    18,
    30,
    42
  ],
  "flowRates": [
    1,
    5,
    10,
    30,
    50
  ],
  "maxPipeDist": 64.0,
  "minPipeDist": 2.0,
  "noDecay": true,
  "commandPrefix": "p",
  "hotKey": "p",
  "updateRate": 2,
  "xmasLights": false
}
This will generated automatically when you run syncPipes for the first time.
filterSizes
This limits the filter slots that pipe has at different upgrade levels. There must be 5 numbers from 0 to 42.
Each number corresponds to the 5 different building materials in the the game from lowest to highest:
Twigs
Wood
Stone
Metal
High Quality
flowRates
This controls the maximum number of items that the pipe can transport on each cycle. There must be 5 numbers that are greater than 0.
Each number corresponds to the 5 different building materials in the game from lowest to highest grade:
- Twigs2. Wood3. Stone4. Metal5. High Quality
maxPipeDist
The maximum distance that a pipe can go
minPipeDist
The minimum distance a pipe can go. If you set this lower than 2 the pipes will stick out of the ends of the containers as they have a minimum length.
noDecay
The pipe will not decay over time. However if the container at either end decays then the pipe will be removed automatically.
commandPrefix
This is the prefix that the player can use to activate syncPipes from the chat menu. By default it is p which the user would use by typing \phowever you can override this is \p is already in use for another mod.
hotKey
This is the key that is suggested to the user in the binding hint. By default this is p however you can override it if you already suggest binding p to a different command.
updateRate
This is the delay in seconds between each cycle of moving items through the pipes. The lower you set this the faster the pipes will be but this will cause more lag.
xmasLights
If this is true then a string of lights is attached to the top of each pipe.
Permissions
In order to use Sync Pipes you will need to be assigned to the syncpipes.user group. If you don't then you will get a "You've not been given permission to user syncPipes" message.
Admin Permissions
syncpipes.admingives the player admin privileges. They can build as many pipes as they like and upgrade to any level. It also allow them to build and open pipes even in range of an unauthorised TC. (syncpipes.useris not required if you are an admin).
Permission Levels
These are optional levels you can set to control how many pipes and what grade players can upgrade their pipes to. There is not limit to the number of these additional levels you can have
These are added at the bottom of the config file after xmasLights
{
  ...
  "xmasLights": false,
  "permLevels": {
//      "newLevel":{
//          "upgradeLimit": 0 - twigs, 1 - Wood, 2 - stone, 3 - metal, 4 - high quality, -1 - unlimited (high quality)
//          "pipeLimit": -1 - unlimited, or the number of pipes that can be built
//      },
      "level1": {
      	"upgradeLimit": 1,	// This allows pipes to be upgraded to wood.
      	"pipeLimit": 25     // This allows the player a maximum of 25 pipes.
      },
      "level2": {
      	"upgradeLimit": -1, // This allows pipes to be upgraded all the way to high quality metal.
      	"pipeLimit": -1		// This allows the player to build an unlimited number of pipes.
      }
  }
}
Assigning permissions to players
You can grant permissions to a player using the standard oxide commands. To assign a permission use:
oxide.grant <user or group> <name or steam id> <permission>
The easiest way to get a players steam id is to pull it from the server logs as the player logs in.
So if you wanted to assign a user admin you would use:
oxide.grant user 76491328546245 syncpipes.admin
To assign a permission level you would use:
oxide.grant <user or group> <name or steam id> syncpipes.level.<permissionlevel>
So to grant the same user level2 you would use:
oxide.grant user 76491328546245 syncpipes.level.level2
If you want to remove permissions you just use:
oxide.revoke <user or group> <name or steam id> <permission>
Sample Config File
{
  "filterSizes": [
    0,
    6,
    18,
    30,
    42
  ],
  "flowRates": [
    1,
    5,
    10,
    30,
    50
  ],
  "maxPipeDist": 64.0,
  "minPipeDist": 2.0,
  "noDecay": true,
  "commandPrefix": "p",
  "hotKey": "p",
  "updateRate": 2,
  "xmasLights": false,
  "salvageDestroy": true,
  "permLevels": {
    "sticks": {
      "upgradeLimit": 0,
      "pipeLimit": 15
    },
    "wood": {
      "upgradeLimit": 1,
      "pipeLimit": 25
    },
    "stone": {
      "upgradeLimit": 2,
      "pipeLimit": 35
    },
    "metal": {
      "upgradeLimit": 3,
      "pipeLimit": 45
    },
    "hqm": {
      "upgradeLimit": -1,
      "pipeLimit": -1
    }
  }
}
Known issues
None
Future development
Sometimes it can be difficult to hit a pipe at the right angle to get the menu to open. To try and address this, I'm hoping to increase the functionality of the containers and add a menu to the containers showing all the pipes coming into and going out of that container. I would also like to implement a way of traversing the pipes so you can get to and manage pipes that you have no physical access to.
There is also an option that hasn't been enabled yet to allow you to control how the system takes items from the container. The container will currently count all stacks of the same item to move them and then split that evenly between the pipes. But you may want it to only take one stack at a time. This will hopefully come in with the container menu.
I have been investigating a way to allow for pipe to run on an on demand basis. This would be used to allow you to have a fuel storage with a pipe to a furnace and the pipe would supply only the fuel that was needed for the materials available and stop the furnace once the raw material was used up. Rather than burning all the wood whilst waiting for more raw materials.
Permission is hereby granted, free of charge, to any person obtaining a copy
of this software and associated documentation files (the "Software"), to deal
in the Software without restriction, including without limitation the rights
to use, copy, modify, merge, publish, distribute, sublicense, and/or sell
copies of the Software, and to permit persons to whom the Software is
furnished to do so, subject to the following conditions:
The above copyright notice and this permission notice shall be included in all
copies or substantial portions of the Software.
THE SOFTWARE IS PROVIDED "AS IS", WITHOUT WARRANTY OF ANY KIND, EXPRESS OR
IMPLIED, INCLUDING BUT NOT LIMITED TO THE WARRANTIES OF MERCHANTABILITY,
FITNESS FOR A PARTICULAR PURPOSE AND NONINFRINGEMENT. IN NO EVENT SHALL THE
AUTHORS OR COPYRIGHT HOLDERS BE LIABLE FOR ANY CLAIM, DAMAGES OR OTHER
LIABILITY, WHETHER IN AN ACTION OF CONTRACT, TORT OR OTHERWISE, ARISING FROM,
OUT OF OR IN CONNECTION WITH THE SOFTWARE OR THE USE OR OTHER DEALINGS IN THE
SOFTWARE.